
Centaur Rig:
- Jan 28, 2016
- 3 min read
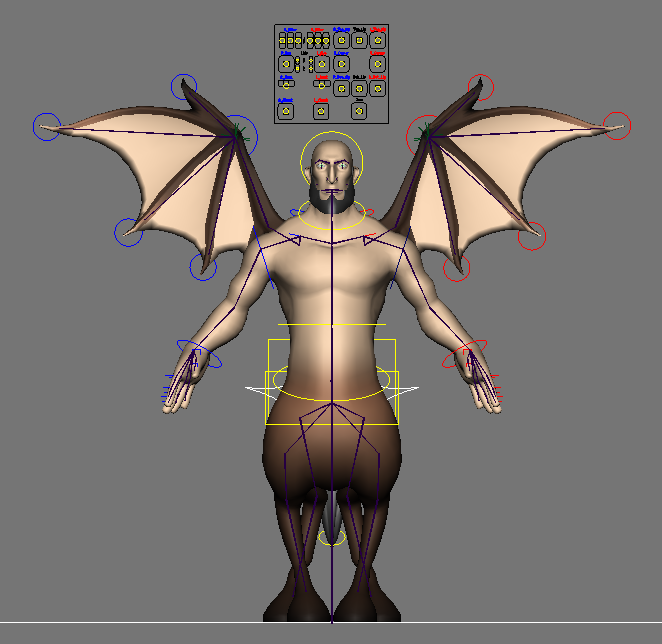
So, it's been a while since I have posted here, sorry about that! It's been a crazy couple of weeks as I am ramping up to start my final semester in my Game Development degree. I have been working on quite a few projects simultaniously, like Without a Clue, the game I posted about some weeks ago. I also have been developing some simple tools to help my creative process whilst rigging. I found a really cool centaur rig recently and have since started rigging it. I have a chameleon rig, which can be seen in my reel on the home page, and with this centaur rig I wanted to tackle some features that were not displayed on the chameleon, so that I could show a wide array of skills.
So, for this centaur rig I decided to do a really complex facial rig. So I started plugging away on learning, and relearning some skills to help me better accomplish the facial rig. I ended up deciding that a control scheme wherein which the controls were off to the side seemed to be the most logical for this specific model. So I made a whole scheme of controls with sliders that are labelled that control each of the different sections of the face. I think this method really gives the animator full control without allowing too much room for error. I actually have animated on a rig with controls laid out this way and it helped me accomplish the correct shapes and phonemes, but didn't bog me down with complex controls that sometimes got lost or tangled among the mesh.

This centaur rig not only will have a complex facial rig but I was able to modify some wings and attach them to the cetaur so I could do a wing collapse as well. I figured since the centaur isn't necessarily an extremely exciting model to rig, there isn't even any need for foot roll, or any complex feature for that matter, that adding wings would help the interest level.
I also was able to come up with a simple, yet extremely helpful tool. I was able to make a tool that takes whatever nurbs you have selected and re-colors them. As most riggers know the manual way to re-color a nurbs curve is to select the object, go into the attributes, enable overrides and pick your color. Riggers also know that if you have any sort of complex shape, like text, you could, in theory be sitting there re-coloring each curve for a very long time. It's tedious and a waste of time frankly! So my tool allows you to just select all the curves you want to re-color, open the tool which is on the custom shelf, enter the color you would like, which is a number, but I made a note that tells you the number certain colors correspond to, like red is 13 I believe, etc. Then you put your number in, save the tool and press it with the nurbs selected and viola!, your nurbs are that color. It really did save me tons of time!
Overall I'm really enjoying rigging this model and it's getting me into the right mindset for school work and my final semester.
I hope to be posting more regularly, as I am taking some exciting classes this semester, (delving into c++, eek!) and I hope to learn a lot from all these classes and apply them to my work, portfolio, and website! :)


Comments